Research
- Crime Categories
- Murder Circumstances
- Charges
- Murder Numbers by SHR
- Definitions of Murder
- Crime Literature
- Other Literature
- Seminars
- Journal Ranking
- Laws
- Changes in Law and Reporting in Michigan
- Citation Guides
- Datasets
Writing
Methods
- BLP
- Econometrics Models
- Econometrics Tests
- Econometrics Resources
- Event Study Plots
- Metrics Literature
- Machine Learning
Python-related
- Python Basic Commands
- Pandas Imports and Exports
- Pandas Basic Commands
- Plotting in Python
- Python web scraping sample page
- Two Sample t Test in Python
- Modeling in Python
R-related
- R Basics
- R Statistics Basics
- RStudio Basics
- R Graphics
- R Programming
- Accessing MySQL Databases from R
Latex-related
Stata-related
SQL
Github
Linux-related
Conda-related
AWS-related
Webscraping
Interview Prep
Other
Some Tips on Using GitHub
Table of Contents
- How to turn a local folder into a GitHub repo
- Basics for how to commit changes and push to remote branch
- Set the default programming language for a repo
- How to have two or more GitHub accounts on one local machine
How to turn a local folder into a GitHub repo
First, git init in the local folder following this post. Then, the rest of the steps as written here.
Basics for how to commit changes and push to remote branch
First, stage all the changes:
$ git add .
Then, check if you have staged all that you would like to stage:
$ git status
Next step is to commit the files locally with a message:
$ git commit -m "message here"
Last, push the changes to the remote repo “gh-pages”:
$ git push origin gh-pages
Set the default programming language for a repo
GitHub uses a library called Linguist to identify the top language used in a repo. The identification can be either automatic or self-specified. In order to specify the language, make a file called .gitattributes in the root folder and write the following lines based on the programming language used:
*.Rmd linguist-detectable=true
*.ipynb linguist-detectable=false
How to have two or more GitHub accounts on one local machine
How to have two or more GitHub accounts on one local machine (Windows)
How to change contents in fork based on changes in original repo
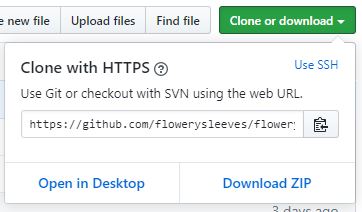
Note that the second article neglected to mention one setting in GitHub that might cause a “[remote rejected]” error. In the repo that you would like to change, there is a green “Clone or download” button.

After clicking on it, you will find that the default is to clone with HTTPS.

Since we set up authentication with an SSH key based on the first link above, it is important that we choose “Use SSH” for authentication. Once we click on “Use SSH”, we see the following:

This way, we could proceed to push the changes to the server and not worry about being rejected by the remote.